Showing posts with label lunchbox. Show all posts

Friday, March 29, 2013

Super Fluffy Apple Banana Matzo Muffins

Every year during Passover, abstaining from baked goods isn't difficult... until the second day. And then the third day... These days, there are lots of store bought options as well as fantastic ideas online available to those that observe the holiday. 


Fluffy Apple Banana Matzo Muffins


These muffins are so yummy that you will want to make them with all of the extra matzo cake meal that you have left over from the holiday! Go ahead and do it... no one will know that these were intended to be Passover-friendly!


Always trying to get a better shot... Apple Banana Matzo Muffins


Super Fluffy Apple Banana Matzo Muffins

Makes approximately 20 muffins (depending on the size of your muffin pan and how full you fill each pocket)

Ingredients

1 2/3 cups all purpose matzo cake meal
1 1/2 teaspoon baking soda
1/4 teaspoon ground cinnamon (optional)
1/2 teaspoon salt
1 cup plus 2 tablespoons sugar
2 eggs
2 egg whites
1/2 cup apple sauce
3 1/2 bananas, very ripe, mashed
1 Gala apple, coarsly grated
2 tablespoons creme fraiche (or sour cream)
1 teaspoon vanilla extract

Canola oil for muffin tin (spread with a small napkin) or Non stick cooking spray


Directions

Preheat oven to 350 degrees F. 
Line muffin tin with liners or spray with non-stick cooking spray or wipe each pocket with a napkin and canola oil.

1. Sift together the flour, baking soda, cinnamon (optional) and salt. 
2. Beat sugar, eggs and egg whites with a whisk until light and fluffy, about 10 minutes. 
3. Add apple sauce, mashed bananas, grated apple, creme fraiche, and vanilla. 
4. Fold in dry ingredients.
5. Fill each muffin pocket about 2/3 full.
6. Bake 22 to 25 minutes, until toothpick in center comes out clean.

Eat, Drink & Be Yummy!

Wednesday, March 6, 2013

Carrot Croquettes with Yogurt Dipping Sauce


Keeping things interesting is always a challenge. It's so easy to fall into a food routine. I often make zucchini pancakes because they're easy and I somehow always have zucchini or summer squash on hand. But why not make something similar with carrots?!

Carrot Croquette with Yogurt Dipping Sauce

This dish has as much flexibility as I love with most of my go-to recipes. Add whatever herbs and seasonings you like. Don't want to fry them on a skillet? Bake them at 400 degrees for 20 minutes. No panko? Breadcrumbs will work just as well.

These were a big hit with the kids, as well as a small dinner party that I hosted. All of the other appetizers were cold, so I was able to make these and serve them immediately. These carrot croquettes are yummiest when they're immediately made, but you can make a batch big enough to refrigerate and then reheat.

Enjoy!

Inside shot of the Carrot Croquette

Carrot Croquettes with Yogurt Dipping Sauce

Makes approximately 25 croquettes

Ingredients

For the Carrot Croquettes:
1 pound carrots, thinly shredded

3 cloves garlic, finely minced/grated
1/2 cup Panko bread crumbs, plus more for coating

2 large eggs
1 teaspoon salt
1/2 teaspoon freshly ground black pepper
For the Yogurt Dipping Sauce:
1/3 cup Fage 0 (or any other kind of Greek style yogurt)
1 tablespoon freshly squeezed lemon juice
2 cloves garlic, grated
1 tablespoon parsley, finely chopped.

Vegetable oil for frying

Directions

Combine all ingredients for the Yogurt Dipping Sauce. The sauce can be made up to 1-2 days in advance.

1. Drain as much liquid as possible from the finely shredded carrots by putting them into a kitchen towel and squeezing out excess liquid.
2. In a large bowl, combine finely shredded carrots with garlic, panko, eggs, salt and pepper.
3. Using a 1.5 tablespoon ice cream scooper (I like uniform croquettes) or soup spoon, scoop out a spoonful of the carrots. Gently flatten and form into a 1 1/2 inch patty. 
4. Gently roll in reserved panko to coat. Place on a platter. Repeat with remaining carrots.
5. Heat skillet with a couple of tablespoons of vegetable oil over medium/high heat.
6. Working in batches (adding a couple of tablespoons of oil after each batch), fry croquettes until golden brown on each side (approximately 3 minutes per side). Transfer to a paper towel-lined plate to drain excess oil.
7. Serve & enjoy.

Eat, Drink & Be Yummy!

Wednesday, February 13, 2013

Chickpea & Edamame Salad


I always knew that wine and cheese (and women!) get better with age. I'd like to officially propose the addition of this salad to the list. The first day you make it, it will be delicious. The day after, it will taste even better and by the third day you're going to wish that you didn't eat so much on day 1 & 2! This is a great salad to make at the beginning of the week and then enjoy throughout as a snack or as a meal.

Chickpea & Edamame Salad with Carrots, Red Peppers and Dried Cranberries

I set out to recreate Pret-A-Manger's Chickpea and Edamame Salad Pot and ended up with so much more! It has subtle textures: a little crunchy, soft and chewy. Fantastic flavor, hitting on sweet, sour and savory notes. This colorful and healthful salad is a huge hit with the kids, a great option for dinner parties and holds up really well for potlucks. 

Chickpeas, Carrots, Edamame & Cranberries


One red pepper, diced


All salad ingredients into one bowl.


Trying to get "the shot"


Chickpea & Edamame Salad


Chickpea and Edamame Salad


Adpated from Mother Thyme
Serves 10-12 as a side

Ingredients


Salad
3 15.5oz cans chickpeas (garbanzo beans) rinsed and drained
2 1/2 cups shelled edamame (soy beans)
1 red pepper, diced
3/4 cup carrots, diced
1/2 cup dried cranberries

Dressing
4 tablespoons canola oil
4 tablespoons olive oil
4 tablespoons white balsamic vinegar
1 tablespoon sugar
1/2 teaspoon dried oregano
1/2 teaspoon dried basil
Kosher Salt (about 1 1/2 teaspoons)
Freshly Ground Pepper (about 15 turns of the grinder)

Directions

1. In a large bowl combine chickpeas, edamame, red pepper, carrots and dried cranberries. Set aside.
2. In a small bowl combine dressing ingredients. Add kosher salt and pepper to taste (I've indicated what works well for us).
3. Add dressing to salad and toss to combine. Taste and adjust seasoning, if needed.
4. Serve at room temperature or chilled. 
5. Will keep in an air tight container in the refrigerator for up to 4 days.

Eat, Drink & Be Yummy!

Top Food Blogs-->

Friday, February 8, 2013

Tomato, Corn & Tarragon Salad


The first time I made this salad was with farm fresh corn and tomatoes from Connecticut farmers markets. Well, in truth, I made it when I was trying to use up leftover grilled corn from the previous nights barbecue. With beautiful grape tomatoes and a bit of tarragon, it was a refreshing, yet filling salad.


The salad also fulfills my need for flexibility. While I may give exact proportions for the salad, feel free to increase or decrease the ratio of corn to tomatoes. If you don't have fresh tarragon (or don't like tarragon), a great substitution would be fresh basil. 

In the winter months, I'm more than happy to recreate the salad using frozen corn. I love the mixture of Trader Joe's Fire Roasted Corn with their Cut White Corn. The charred, smokey flavor marries so well with the sweetness of the white corn. Enjoy the salad either at room temperature or slightly warm... either way, it's fantastic!


Finely dice two shallots (about 1/2 cup)


About 2 cups of frozen (or fresh!!) corn kernels.
OK, fine... 2 1/2 cups ;)


Shallots & frozen corn kernels ready for action!


Lightly saute shallots, until they just start to soften and brown


Add corn kernels and saute until just warmed through, about 2-3 minutes


Grape tomatoes. Halved.


Tarragon: whole leaves


Tarragon: finely chopped leaves


Tomato, Corn & Tarragon Salad


Tomato, Corn & Tarragon Salad

Serves 6-8 as a side

Ingredients

2 teaspoons canola oil
1 cup Trader Joe's Fire Roasted Frozen Corn

1 1/2 cups Trader Joe's Cut White Corn
1/2 cup diced shallots
1 1/2 pound grape tomatoes, halved
1 tablespoon chopped fresh tarragon, more to taste
Kosher salt
Freshly ground pepper

Directions

1. Heat oil in a skillet over medium heat. 
2. Add shallots and saute, until lightly browned, about 3-4 minutes.
3. Add corn and saute until warmed through, about 3-4 minutes.
4. Remove from heat and let cool for 5-10 minutes.
5. In a large bowl, combine corn and shallot mixture, tomatoes, and tarragon. Gently toss.
6. Season with kosher salt and freshly ground pepper to taste.

Eat, Drink & Be Yummy!

Thursday, January 24, 2013

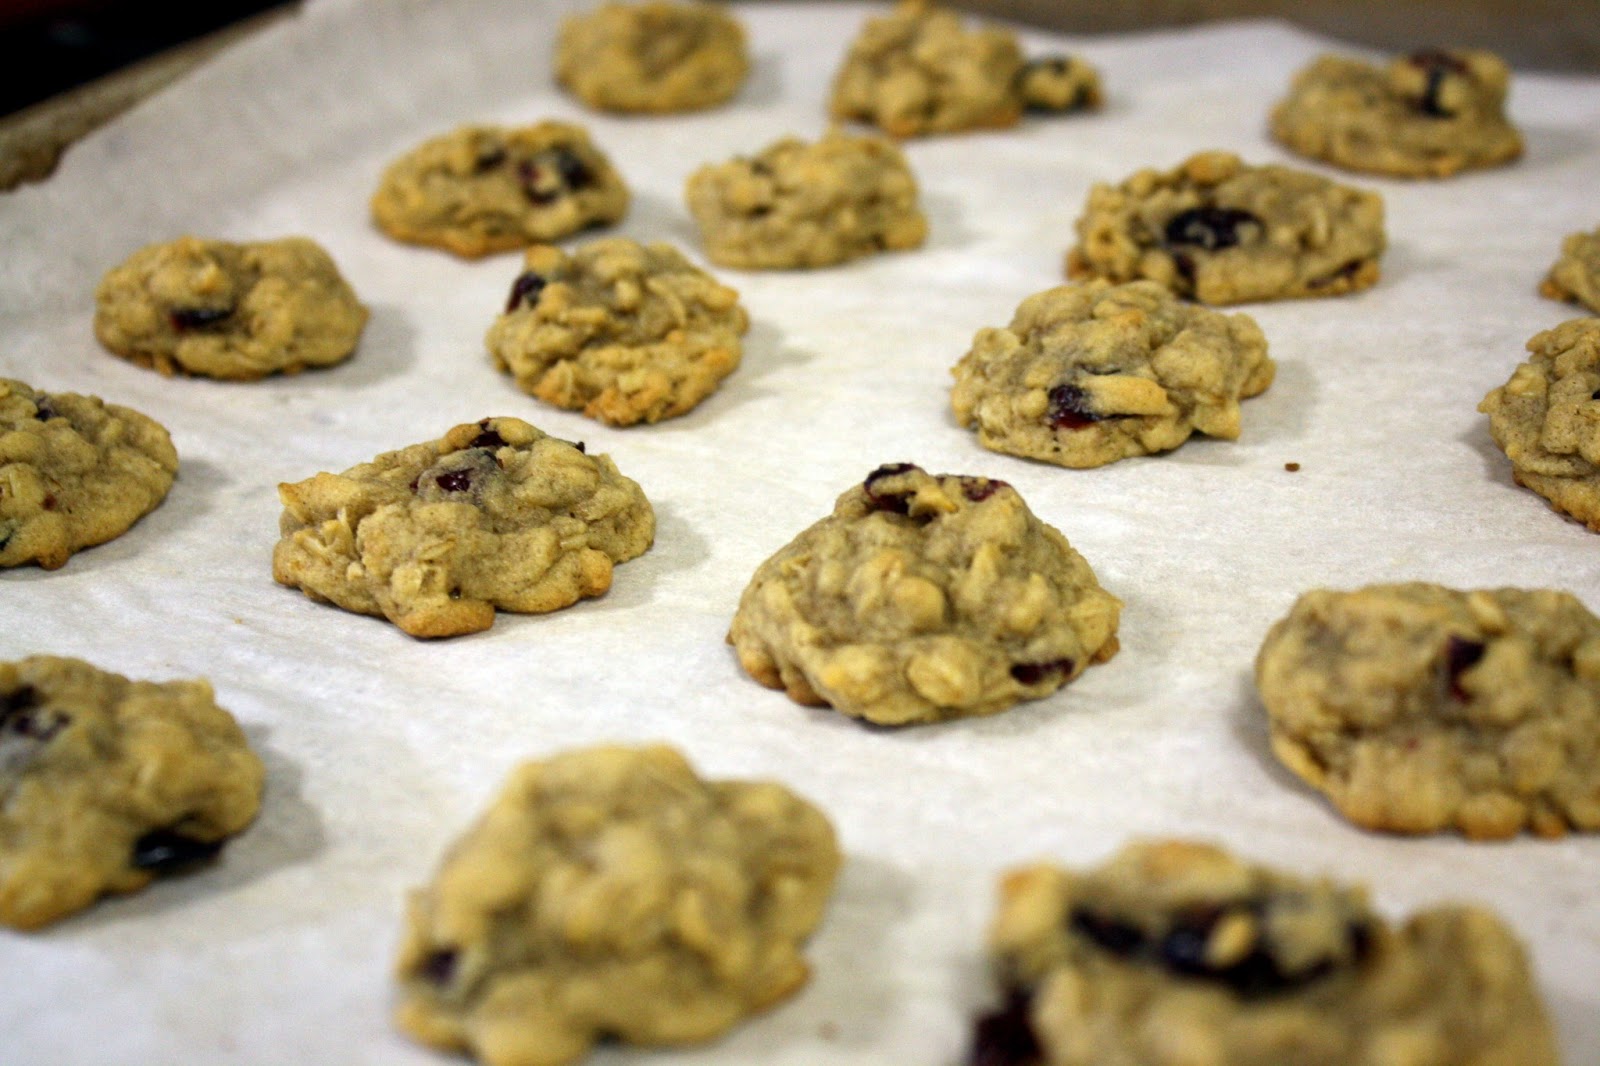
Oatmeal Craisin Cookie Bites


There's nothing that gives the illusion of "healthy" like combining oatmeal and dried fruit into a cookie. Let me be completely honest. Cookies are cookies. They are NOT healthy, so don't fall for someone's claim that they are. Oatmeal on it's own? Nutritional powerhouse! Fresh cranberries? Antioxidant superstars! But dry and sweeten those cranberries and combine them with oatmeal, butter, flour, eggs... you've got great tasting cookies!

I've been making this same recipe for more years than I should admit to. Sometimes with raisins, sometimes adding nuts. Sometimes I use a larger scoop to make bigger cookies (adjust the bake time accordingly). No matter how I've adjusted the recipe, it has never failed me. Enjoy!

Oatmeal Craisin Cookie Bites


Smaller cookies means less guilt... when you go back for a second and a third!


Oatmeal Craisin Cookie Bites

 Oatmeal Craisin Cookie Bites


Makes about 80 small cookies
Adapted from Emeril Lagasse

Ingredients

1 cup (2 sticks) unsalted butter, room temperature
3/4 cups sugar
3/4 brown sugar
2 eggs, room temperature
2 cups all purpose unbleached all purpose flour
1 teaspoon salt
1 teaspoon ground cinnamon
1 teaspoon baking soda
2 cups oatmeal (NOT INSTANT!!!)
1 teaspoon hot water
1 1/2 cups craisins
2 teaspoon vanilla extract

Directions

Preheat oven to 350 degrees F. Line a cookie sheet (or two) with parchment paper.

1. Add the butter and sugars into KitchenAid mixing bowl and cream with paddle attachment. Let it run for 2-3 minutes, scraping down the sides of the bowl, if necessary.
2. Add the eggs to the mixer and mix to combine. 
3. Add flour, salt, cinnamon, and baking soda. Mix well on low (2 speed). 
4. Remove the bowl from the mixer. Add the oatmeal, water, craisins, and vanilla.  Mix by hand. Don't overwork the dough.
5. Using a 1 1/2 teaspoon scoop, place 20-30 drops of dough on parchment paper lined baking sheet. Leave at least 1" in between cookie dough balls.
6. Bake for 7-9 minutes, until bottom starts to lightly brown. (8 minutes is the magic number for my oven)
7. Remove from oven and let stand for 2-3 minutes. Use a spatula and transfer to a cooling rack.
8. Store in an airtight container for up to 5 days.

Eat, Drink & Be Yummy!

Wednesday, November 28, 2012

Pasta with Roasted Vegetables


Here's another secret ingredient that is virtually impossible to mess up. Pasta. I can add almost anything to pasta and my kids will eat it. I generally take full advantage of this and go overboard with vegetables. Even if they pick out some elements, I'm guaranteed that they'll eat more than if I had plated the veggies separately from the pasta.

No special sauce or lengthy preparation is required. So while the kids will love the results, you're going to love the preparation!

The flexibility (you've figured out that I'm fond of flexibility, yes?) is that I can add any vegetables that I have on hand. Other options could easily include mushrooms, olives, capers... whatever vegetables you like or maybe a few vegetables that you don't like. Because hey, if they're hanging out with pasta, maybe you'll like them too!

Pasta with summer squash, zucchini, eggplant and tomatoes


Pasta with Roasted Eggplant, Zucchini, Squash & Tomatoes

Serves 4 as an entree

Ingredients

2 yellow summer squash, cut into 1/2" disks and then quartered
2 zucchini, cut into 1/2" disks and then quartered
1 eggplant, cut into 3/4" pieces
1 pint grape or cherry tomatoes
4 shallots, coarsly chopped
4 garlic cloves, crushed
1/4 cup olive oil
Kosher salt and freshly ground pepper
8 ounces short shaped pasta (bowties or smaller)
2 tablespoons unsalted butter
1/2 cup finely grated parmesan cheese, plus more for serving
6 or 7 large basil leaves, finely chopped (add more if you LOVE basil!!!)


Directions

Preheat oven to 450 degrees. 

1. In a large bowl toss squash, zucchini, eggplant, shallots, tomatoes and garlic with olive oil and season with kosher salt and pepper.
2. In a single layer, spread on two large, lined baking sheets. Roast for 30 minutes, until tender but not completely soft and mushy.
3. While the vegetables are roasting, cook the pasta as per package.  Drain and return to pot.
4. Add roasted vegetables.
5. Toss in the butter and combine until the butter has melted. 
6. Add parmesan and basil.  Toss to combine.
7. Taste and adjust salt and pepper if necessary.
8. Shred some extra parmesan on top of the finished product.

Eat, Drink & Be Yummy!

Monday, November 26, 2012

TJ's Turkey Ricotta Meatballs


Two and a half years ago, Trader Joe's opened in my neighborhood. My world changed. No longer was the store reserved as a "destination" shopping trip. No longer did I have to suffer the financial indignities of Whole Foods, appropriately nicknamed Whole Paycheck. I was in heaven!

I know that people flock to Trader Joe's for their prepared foods, frozen, fresh and shelf stable. But now that it had become my local grocery store, I found so much fun and flexibility in the basics that it was easy to come up with my own recipes. 
Joy. Sheer joy...Watching my army of perfectly lined up meatballs

Baking these meatballs also ups their status on the healthful index! Plus, the turkey meatballs can be eaten immediately, stored in an airtight container for up to 5 days or frozen and defrosted when you're ready to eat them. Of course this recipe can be recreated using other brand items, but if you happen to be in Trader Joe's it will be a one stop shopping trip!

I frequently make the quantity that I describe below. It's quite a lot and makes about 140 meatballs.  Feel free to freeze the cooked and cooled meatballs or go ahead and half the recipe!

Two packs of ground turkey... this is going to be enough to feed a small army!


Add the ricotta

Add two eggs


Add frozen basil cubes or 1/4 cup fresh basil finely chopped
(make sure you defrost them first... I was too anxious to take the picture here)

Add a cup of panko


Combine all ingredients.
I use an ice cream scoop to make even-sized meatballs


I fit 60 meatballs onto one baking sheet.
Place them close to each other, but don't let them touch.


Baked turkey ricotta meatballs

TJ's Turkey Ricotta Meatballs 

Makes approximately 50 meatballs (go ahead and make half of this recipe for an average family)

Ingredients

2 1/2 pounds ground turkey breast (two packs of ground turkey)
1 cup fat free ricotta cheese
2 eggs
1 cup panko breadcrumbs
4 TJ's frozen basil squares, defrosted (or 1/4 cup of fresh basil, finely chopped)
About 15 turns pepper grinder
1 teaspoon salt

Optional: Splash of seltzer/club soda/water

Directions

Preheat oven to 375 degrees.

1. Combine ground turkey breast with the other ingredients in a large bowl.
2. Optional: add a splash of seltzer water (about 1/4 cup). It will make the meatballs juicier.
3. Using a 1 ounce/1 Tablespoon ice cream scoop, place meatballs onto two large foil or parchment paper lined baking sheets. They can be tightly placed, but don't let them touch.
4. Bake for 23-25 minutes, until juices run clear.
5. Remove from oven and allow to cool. Gently remove from baking sheet.

Eat, Drink & Be Yummy!

Lemon Crinkle Cookies


One of my (many) weaknesses are sugar cookies.  I can't seem to perfect them.  Sometimes I get the dough right, but then have a hard time rolling them out into an even thickness.  Or I mess up the cookie cutters... Or the cutting part works out well, but the cookie itself is dry.  ::sigh::  While I continue to work on a butter cookie recipe that will work for me time and time again, I will continue to ROCK cookies that DO NOT have to be cut with cookie cutters!

Lemon Crinkle Cookies

These lemon crinkle cookies can be eaten immediately or kept in an airtight container up to a week; although you'll see them disappear long before that!  These are fantastic for cookie sharing parties or for holiday presents. Their flavor flexibility also extends beyond any single season... they're perfect anytime!

Combine wet ingredients in a stand mixer, or with a hand held mixer


Combine dry ingredients in a bowl and mix to incorporate.


Stir in dried ingredients, just long enough to combine.
Use a spatula to scrape down the sides of the bowl


Roll dough in powdered sugar


Place cookie balls on parchment paper lined baking sheet


Baked cookies


mmmmm.... Lemon Crinkle Cookies


Cooling the cookies before they're devoured!


Lemon Crinkle Cookies

Makes about 7 dozen teaspoon cookies or about 2.5 dozen Tablespoon cookies

Ingredients

1 cup butter, room temperature
2 cup granulated sugar

1 teaspoon vanilla extract
2 whole eggs
1 Tablespoon lemon zest
2 Tablespoon fresh lemon juice
1/2 teaspoon salt
1/2 teaspoon baking powder
1/4 teaspoon baking soda
3 cups unbleached all-purpose flour
½ cups powdered sugar in a shallow bowl (for rolling)

Directions

Preheat oven to 350 degrees. 

1. Cream butter and sugar in a stand mixer until light and fluffy, about 2-3 minutes. 
2. Whip in vanilla, egg, lemon zest, and juice. 
3. Sift together all dry ingredients (except for the powdered sugar).
4. Add dry ingredients to stand mixer and mix to combine.
5. Using a teaspoon measuring spoon or ice cream scoop, measure out dough. Roll them into a ball in your hands and then cover in powdered sugar.
6. Repeat ball making, placing each ball at least 2 inches apart on baking sheet.
7. Bake for 10 minutes, or until bottoms are barely brown  and the top has softly crinkled.
8. Remove from oven and let cool on baking sheet for 2-3 minutes before transferring to cooling racks.