Showing posts with label Kid Friendly. Show all posts

Friday, March 29, 2013

Super Fluffy Apple Banana Matzo Muffins

Every year during Passover, abstaining from baked goods isn't difficult... until the second day. And then the third day... These days, there are lots of store bought options as well as fantastic ideas online available to those that observe the holiday. 


Fluffy Apple Banana Matzo Muffins


These muffins are so yummy that you will want to make them with all of the extra matzo cake meal that you have left over from the holiday! Go ahead and do it... no one will know that these were intended to be Passover-friendly!


Always trying to get a better shot... Apple Banana Matzo Muffins


Super Fluffy Apple Banana Matzo Muffins

Makes approximately 20 muffins (depending on the size of your muffin pan and how full you fill each pocket)

Ingredients

1 2/3 cups all purpose matzo cake meal
1 1/2 teaspoon baking soda
1/4 teaspoon ground cinnamon (optional)
1/2 teaspoon salt
1 cup plus 2 tablespoons sugar
2 eggs
2 egg whites
1/2 cup apple sauce
3 1/2 bananas, very ripe, mashed
1 Gala apple, coarsly grated
2 tablespoons creme fraiche (or sour cream)
1 teaspoon vanilla extract

Canola oil for muffin tin (spread with a small napkin) or Non stick cooking spray


Directions

Preheat oven to 350 degrees F. 
Line muffin tin with liners or spray with non-stick cooking spray or wipe each pocket with a napkin and canola oil.

1. Sift together the flour, baking soda, cinnamon (optional) and salt. 
2. Beat sugar, eggs and egg whites with a whisk until light and fluffy, about 10 minutes. 
3. Add apple sauce, mashed bananas, grated apple, creme fraiche, and vanilla. 
4. Fold in dry ingredients.
5. Fill each muffin pocket about 2/3 full.
6. Bake 22 to 25 minutes, until toothpick in center comes out clean.

Eat, Drink & Be Yummy!

Friday, March 8, 2013

Fennel, Apple & Celery Root Slaw


Cabbage slaws are great... but after having them every weekend during summer barbecues, it was time for something new.  This three ingredient slaw has sturdy texture that holds up to a creamy dressing! The fennel's licorice flavor is nicely balanced by the granny smith apple as well as the honey in the dressing. Fantastic flavor combination!


You can make the entire slaw a day ahead of when you plan to eat it, but make sure to dress it shortly after you cut the ingredients, otherwise, without the acid, they start to brown very quickly.

Fennel, Apple & Celery Root Slaw


Ready, Prep, Go!


Julienne the fennel, celery root and granny smith apples


Dressed with Greek Yogurt, this is a refreshing slaw that is delicious all year-round!


Fennel, Apple & Celery Root Slaw


Fennel, Apple & Celery Root Slaw


Serves 10 as a side

Ingredients

2 fennel bulbs, medium size
2 granny smith apples
1 large celery root, peeled
3 Tablespoons olive oil
3 Tablespoons white balsamic vinegar
3 Tablespoons greek yogurt (Fage 0)
2 teaspoons mayonnaise
1 Tablespoon honey
kosher salt
freshly ground pepper
2 teaspoons chopped fresh parsley


Directions

1. Using a mandolin, shave the fennel.
2. Using a mandolin, julienne the apples and celery root. Toss with the fennel in a large bowl.
3. In a small bowl combine the olive oil, white balsamic vinegar, greek yogurt, mayonnaise and honey. Whisk together and taste.  Add kosher salt and pepper to taste
4. Toss the dressing with the fennel, apples and celery root.  
5. Eat immediately, or chill for up to two days. (It tastes best after being dressed for about 1 day)
6. Add the parsley before serving.

Eat, Drink & Be Yummy!

Wednesday, March 6, 2013

Carrot Croquettes with Yogurt Dipping Sauce


Keeping things interesting is always a challenge. It's so easy to fall into a food routine. I often make zucchini pancakes because they're easy and I somehow always have zucchini or summer squash on hand. But why not make something similar with carrots?!

Carrot Croquette with Yogurt Dipping Sauce

This dish has as much flexibility as I love with most of my go-to recipes. Add whatever herbs and seasonings you like. Don't want to fry them on a skillet? Bake them at 400 degrees for 20 minutes. No panko? Breadcrumbs will work just as well.

These were a big hit with the kids, as well as a small dinner party that I hosted. All of the other appetizers were cold, so I was able to make these and serve them immediately. These carrot croquettes are yummiest when they're immediately made, but you can make a batch big enough to refrigerate and then reheat.

Enjoy!

Inside shot of the Carrot Croquette

Carrot Croquettes with Yogurt Dipping Sauce

Makes approximately 25 croquettes

Ingredients

For the Carrot Croquettes:
1 pound carrots, thinly shredded

3 cloves garlic, finely minced/grated
1/2 cup Panko bread crumbs, plus more for coating

2 large eggs
1 teaspoon salt
1/2 teaspoon freshly ground black pepper
For the Yogurt Dipping Sauce:
1/3 cup Fage 0 (or any other kind of Greek style yogurt)
1 tablespoon freshly squeezed lemon juice
2 cloves garlic, grated
1 tablespoon parsley, finely chopped.

Vegetable oil for frying

Directions

Combine all ingredients for the Yogurt Dipping Sauce. The sauce can be made up to 1-2 days in advance.

1. Drain as much liquid as possible from the finely shredded carrots by putting them into a kitchen towel and squeezing out excess liquid.
2. In a large bowl, combine finely shredded carrots with garlic, panko, eggs, salt and pepper.
3. Using a 1.5 tablespoon ice cream scooper (I like uniform croquettes) or soup spoon, scoop out a spoonful of the carrots. Gently flatten and form into a 1 1/2 inch patty. 
4. Gently roll in reserved panko to coat. Place on a platter. Repeat with remaining carrots.
5. Heat skillet with a couple of tablespoons of vegetable oil over medium/high heat.
6. Working in batches (adding a couple of tablespoons of oil after each batch), fry croquettes until golden brown on each side (approximately 3 minutes per side). Transfer to a paper towel-lined plate to drain excess oil.
7. Serve & enjoy.

Eat, Drink & Be Yummy!

Wednesday, February 27, 2013

Roasted Carrots with Thyme


Roasted Carrots with Thyme


Carrots are usually the forgotten side dish. They're boiled into submission. They're taken for granted. They're neglected. Not these carrots! Hell no, they refuse to be ignored! These carrots are incredibly flavorful. They're tender and don't cross the line into mushy territory. And they're flexible. Almost any herb will compliment them: basil, parsley, dill and rosemary would stand in for thyme. Enjoy!


Cutting your carrots on a diagonal makes the look prettier.
Don't question this. It's true.


Carrots Pre-Bake


Carrots Post-Bake


Gently remove the thyme leaves from the sprigs. 
They will fall off quickly. Discard the sprigs and toss the 
thyme leaves with carrots to combine.


Roasted Carrots with Thyme


Roasted Carrots with Thyme

Adapted from Ina Garten

Ingredients

1 pound carrots
2 tablespoons olive oil
Sprinkle kosher salt
10 grinds black pepper

10-12 sprigs fresh thyme

Directions

Preheat the oven to 400 degrees F.
1. Slice carrots into 1 to 1 1/2 inch pieces (they'll shrink after they cook). If you cut them on the diagonal, they'll look fancy.
2. In a large bowl, toss carrots with olive oil, salt, pepper and thyme. 
3. Spread evenly on a baking sheet. Bake for 20 minutes, until browned and tender.
4. Remove thyme leaves from branches (they'll pretty much fall off as soon as you touch them).  
5. Toss and taste.  Adjust for salt and pepper.

Eat, Drink & Be Yummy!

Monday, February 25, 2013

Carrot Creamsicle Milkshake


While this doesn't qualify as a healthy dessert (it's a straight-up milkshake, guys), it serves a purpose. A friend asked me to make a milkshake with vegetables. Her daughter refuses all visible vegetables and she was looking for some stealthy maneuvers. She was thrilled that this milkshake got two carrots into her daughter whereas before, the carrot count would have been zero.

There's no detectable carrot flavor and a minimal change in color. The kids will think that the color came from the orange ;) There's still plenty of flexibility in the recipe. Use chocolate ice cream! Use lower fat milk! Add more orange juice!  Add more carrots! You're going to love it!

Carrot Creamsicle Milkshake


My own taste testers approved.
I was voted "Best Mama" by the after-school crowd 


Carrot Creamsicle Milkshake
(orange was washed out in this picture. I liked the one on top of the page better)


Carrot Creamsicle Milkshake

Makes approximately 24 ounces

Ingredients

1 pint vanilla bean ice cream, softened
4 medium sized carrots
zest of 1 orange
Juice of 1/2 orange
pinch Kosher Salt
1 cup whole milk (or more if you prefer a thinner milkshake)

Directions

1. Take ice cream out and leave it on the counter while you prepare the other ingredients.
2. Peel the carrots and boil them in salted water until soft.
3. In a blender (if you're using an immersion blender, put the ingredients into a tall cup) combine ice cream, soft carrots, orange zest, orange juice and pinch of Kosher salt. 
4. Blend until there aren't any visible carrot pieces. 
5. Add whole milk and blend to combine.

Eat, Drink & Be Yummy!

Saturday, February 23, 2013

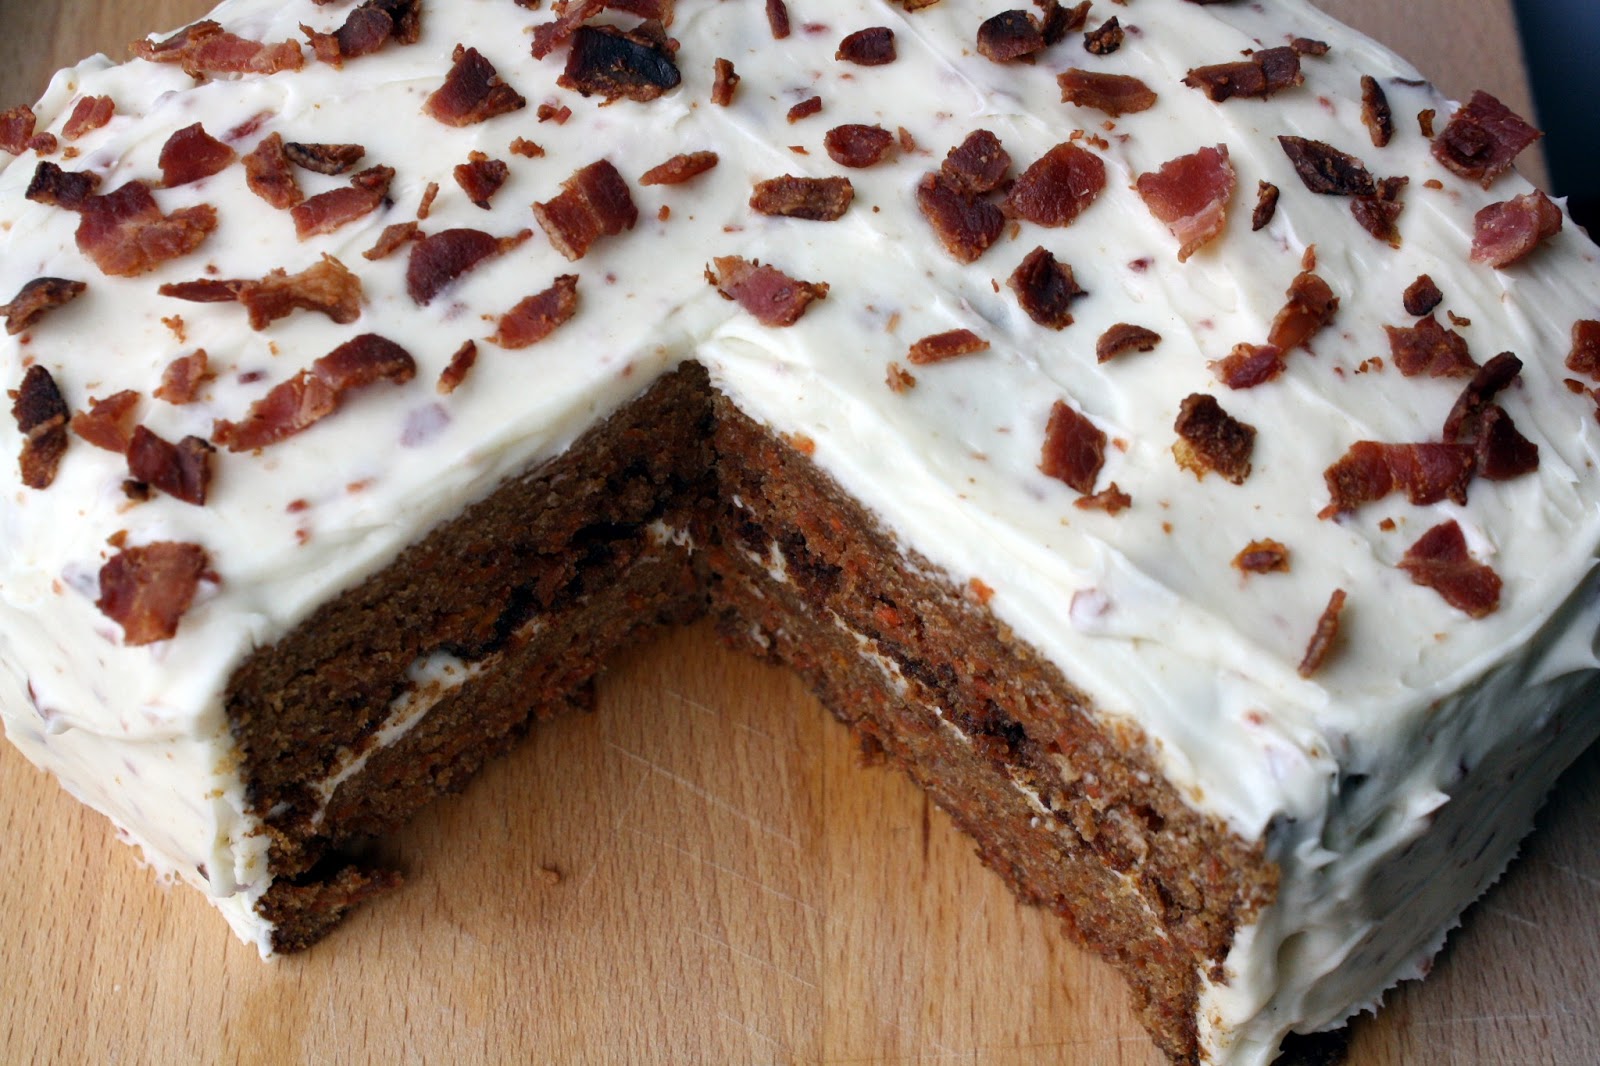
Gluten Free Carrot Cake with Bacon Cream Cheese Frosting


Our family motto is "Bacon and Butter Make Everything Better". When both of those ingredients combine in a single dish? Magic!

Gluten Free Carrot Cake with Bacon Cream Cheese Frosting

I'm really picky about my carrot cake. I like it with carrots, but some people add nuts. Others use coconut. And yet others include raisins. I'm a purist. It's a Carrot Cake. Not a Carrot-Nut- Raisin-Coconut Cake. If you insist on the additional elements when you make this cake, go for it! But I'm a simple girl.

When it comes to the frosting though... well, I'm more than happy to experiment. The salty and smokey addition of bacon compliments the sweetness of the cream cheese. You'll love it!
Getting ready to pull it all together...


Sift the dry ingredients (just noticed my reflection in the sifter! Ha!)


Add butter/oil, applesauce (I used strawberry applesauce) and vanilla to the beaten sugar and eggs.


Shredded Carrots. Definitely worth getting the food processor out of the cabinet.


Combine shredded carrots with cake batter.


Gluten Free Carrot Cake with Bacon Cream Cheese Frosting


Gluten Free Carrot Cake with Bacon Cream Cheese Frosting

Gluten Free Carrot Cake:

Ingredients

2 cups sugar
4 eggs

8 ounces (2 sticks) butter, melted or your favorite vegetable/canola oil
1/2 cup apple sauce
2 cups all-purpose gluten-free flour
2 teaspoons baking soda
2 teaspoons gluten-free baking powder
1 teaspoons cinnamon
1 teaspoon salt
2 teaspoons vanilla extract
1 pound carrots, grated


Directions

Preheat oven to 350° F
This recipe makes: two 9" round cake pans, one 9"x13" pan or muffin/cupcake tins (makes 36). I used two 8"x8" square cake pans. Grease your baking vessel or line your muffin/cupcake tins.
1. Beat sugar and eggs in a large mixing bowl with an electric beater or in a stand mixer. 
2. Add butter (or oil) and vanilla and beat until smooth. 
3. In a large bowl, combine gluten-free flour mix, baking soda, baking powder and salt. Sift to combine. (Using a sifter will allow for a lighter cake texture. If you don't have a sifter, whisk well) 
4. Add the dry ingredients to the wet ingredients and beat until blended.
5. Stir in grated carrots. 
6. Pour the batter into prepared pans.
7. Bake for 40-55 minutes (depending on the size of your baking vessel), until a toothpick comes out clean. Cupcake cooking time is 30-35 minutes.
8. Let completely cool before removing from pan and before icing.


Bacon Cream Cheese Frosting:

Ingredients

8 ounces (2 sticks) unsalted butter, room temperature
12 ounces cream cheese, room temperature
1 pound confectioners' sugar, sifted
3/4 teaspoon pure vanilla extract
12 ounces bacon

Directions

Preheat oven to 450 degrees.
1. Line a baking sheet with foil. Lay out bacon in a single layer.
2. Bake the bacon for 15 minutes, until fragrant and crispy.
3. Remove from oven, cool on a paper towel lined plate.
4. Finely chop all but two slices of the bacon (to incorporate into the frosting).  The other two slices should be coarsely chopped (to top the frosting).
5. Beat butter and cream cheese with a mixer on medium-high speed until fluffy, 4-5 minutes. 
6. Add confectioners sugar, in thirds. Beat at low speed until incorporated. Repeat until all confectioners sugar has been incorporated.
7. Add vanilla and mix to incorporate.
8. Add finely chopped bacon. With a wooden spoon, mix to combine.

Build your cake:
1. Place bottom layer on a cake plate. 
2. Spread 1/3 of the frosting on the top of the cake.
3. Place the second layer on top of the frosted bottom layer.
4. Spread remaining 2/3 of the frosting on the top and sides of the cake.
5. Refrigerate for at least 2 hours and up to 3 days.

Eat, Drink & Be Yummy!

Individual Carrot & Herb Pate


I belong to a great cooking forum on Facebook. The group is made up (mostly) of Russian men and women, but it's most active participants are women. It's very motivating to be part of this group of dynamic cooks.

Individual Carrot & Herb Pate

Recently, one of the members suggested an Iron Chef-like challenge. A secret ingredient would be chosen and then whichever members wanted to participate would their creations a few days later. The first ingredient? Carrots!

If you think about it, carrots are kinda boring (no offense, carrots). They're an outstanding support player (yay mirepoix!!!) but outside of a standard carrot side dishes and carrot cake, they're rarely the star of the show. I loved this challenge because it forced me to look at this simple ingredient in a totally different way. 24 hours after the ingredient was named, I was losing sleep over choosing the one way that I would present it. I requested the ability to post multiple dishes, but was rebuked. I compared my internal dilema to being asked which child I love more... but more difficult.

Finally, I decided to make everything that I wanted to make and then post the picture that I liked the most... but I still get to blog about them all. Quite possibly the best part of this particular dish was that the kids loved it. They said, "hey... it kinda tastes like cheese."

NOTE: Photos are taken of a half batch.
Getting ready with Tofu, Thyme, Tarragon & Carrots
(carrots don't start with a "T", but we still brought them to the party!)


Boiling the peeled carrots


When you grease the lined cookie sheet, grease the cupcake form.
Roast up those carrots!
(I just fold up a napkin into a small square. See it on the left of the muffin pan?)


forgot to include these in the first picture. White miso paste and some apple cider vinegar.


Roasted carrots (they're pretty, right?!)


Herbs. Thyme on the left and tarragon on the right.


Throw all ingredients, except for the herbs, into a blender
(or tall container if you're using an immersion blender)


Puree until smooth


Fill cupcake tray using a #20 ice cream scoop (3 tablespoons)


Bake at 325 degrees for 40 minutes, until center is set.


Carrot Pate with Radish Garnish


Official Taste Testers (drinking Carrot Creamsicle Milkshakes!)


Light + Yummy = Guilt Free


Individual Carrot & Herb Pate

Makes 12 individual pates

Ingredients

1 pound carrots, peeled
2 tablespoons butter, room temperature
2 tablespoons apple cider vinegar
2 tablespoons white miso
1 package silken tofu
2 tablespoons cornstarch
1 tablespoon salt
1 teaspoon thyme, removed from stem and finely chopped
1 teaspoon tarragon, removed from stem and finely chopped
Kosher Salt & Pepper to taste

Directions

Preheat oven to 450 degrees.

1. Cook carrots, covered in salted water until tender.
2. Line a baking sheet with foil and grease with olive oil. At the same time, grease a cupcake tin (with 12 molds) with oil.
3. Drain carrots. Place on prepared baking sheet. Roast in the bottom 1/3 of the oven for about 12 minutes. Turning carrots half way through.
4. Remove carrots from oven. Reduce temperature to 325 degrees.

5. Place carrots and all remaining ingredients, except for herbs, into a blender (or a tall container if using an immersion blender). Blend until thick puree forms.
5. Add herbs and use a wooden spoon to combine. Taste. Add salt and freshly ground pepper to taste.
6. Using an ice cream scoop (#20 size is 1.5 ounces = 3 tablespoons), fill all 12 greased cupcake vessels.

7. Bake for 40 minutes, until center of each cake is set.
8. Cool on a wire rack and then refrigerate for at least 2 hours or overnight. 
9. Remove each pate gently, using a plastic knife (don't scratch the nonstick coating of the muffin tin). 
10. Serve with toast points and thinly sliced radish or cucumber with a sprinkle of salt on top.

Eat, Drink & Be Yummy!

Friday, February 15, 2013

Chocolate Espresso Cake with Dark Chocolate Ganache


Taking a moment to compare baking a chocolate cake to having kids:
     1. Sometimes, baking a cake takes longer than labor. Truth.
     2. 
A "labor of love" is equally relevant to childbirth and baking this cake. 
     3. It's (almost) possible to love chocolate cake as much as your child.

This is a time consuming and labor intensive recipe, but the result is well worth the effort. The cake is moist and fluffy and holds up very well to the amazing buttercream. The ganache? Well, ganache makes everything better, doesn't it? Don't just take my word for it, try it!


Chocolate Espresso Cake with Dark Chocolate Ganache


Chocolate Espresso Cake with Dark Chocolate Ganache

Adapted from Williams Sonoma


Cake:

¾ cup dark unsweetened cocoa powder
⅔ cup sour cream

1 ¼ cups hot water
2 ⅔ cups all-purpose flour
2 tsp baking powder
1 tsp baking soda
½ tsp salt
¾ cup (1 ½ sticks) unsalted butter, cut into 1-inch cubes, softened
½ cup vegetable shortening
1 ½ cups granulated sugar
1 cup firmly packed dark brown sugar
3 large eggs, at room temperature
1 tbs pure vanilla extract

Preheat oven to 325 degrees.
1. In bowl, mix cocoa powder, sour cream and hot water. Set aside to cool. 
2. In a separate bowl, sift together flour, baking soda, baking powder and salt. Set aside.
3. In mixer, beat butter and shortening together until fluffy, about 5 minutes
4. Add sugars and beat 5 more minutes. 
5. Add eggs, one at a time. 
6. Add vanilla, beat on low until incorporated. 
7. Add dry ingredients, alternating with cocoa mixture, in three parts, ending with dry, into mixer bowl. 
8. Divide batter into 3 round pans, buttered under and over parchment paper and dusted with flour.
9. Bake 35 to 40 minutes. Cool for 45 minutes, then remove from pan, and cool completely.


Buttercream

1 ½ cups granulated sugar
1/3 cup all-purpose flour
1 ½ cups whole milk
1/3 cup heavy cream
1 ½ cups (3 sticks) unsalted butter, soft but cool, cut into small pieces
3 tablespoons pure vanilla extract
2 tablespoons instant espresso powder

1. In heavy sauce pan, whisk sugar & flour, then add milk & cream. 
2. Cook over medium heat, whisking occasionally, until mixture comes to a boil and thickens, about 10-15 minutes. 
3. Transfer to mixing bowl, and mix on high with paddle attachments until cool. 
4. Reduce speed to low, add butter. Mix on high until fluffy, about 1-2 minutes. 
5. In a small bowl, combine the vanilla extract and espresso powder. Stir until dissolved.
6. Add vanilla and espresso mixture to buttercream. Mix to incorporate.

Assemble:

1. Place bottom cake layer on plate and trim top to be level. Spread 1.5 cups frosting. 
2. Add next layer, trim and frost. 
3. Add third layer, frost top and sides, with thin layer of frosting. 
4. Place in fridge for 15 minutes. 
5. Then spread cake with remaining frosting, & return to fridge for another 15 minutes.


Chocolate Ganache:

8 oz 60 to 72% dark chocolate, coarsely chopped
¾ cup (1 ½ sticks) unsalted butter, softened and cut into ½-inch pieces
1 tbs light corn syrup

1. Place chocolate, butter, & corn syrup in double boiler, stirring until completely melted & smooth. 
2.  Remove from heat and stir to slightly cool. 
3. Drizzle over cake. 
4. Place in fridge to harden glaze. 
5. Repeat glazing and refrigeration 3 times, allowing the glaze to coat the sides evenly.

Optional: Garnish with 10 to 12 chocolate-covered espresso beans. Good for 3 days, room temp or fridge.

Eat, Drink & Be Yummy!

Wednesday, February 13, 2013

Chickpea & Edamame Salad


I always knew that wine and cheese (and women!) get better with age. I'd like to officially propose the addition of this salad to the list. The first day you make it, it will be delicious. The day after, it will taste even better and by the third day you're going to wish that you didn't eat so much on day 1 & 2! This is a great salad to make at the beginning of the week and then enjoy throughout as a snack or as a meal.

Chickpea & Edamame Salad with Carrots, Red Peppers and Dried Cranberries

I set out to recreate Pret-A-Manger's Chickpea and Edamame Salad Pot and ended up with so much more! It has subtle textures: a little crunchy, soft and chewy. Fantastic flavor, hitting on sweet, sour and savory notes. This colorful and healthful salad is a huge hit with the kids, a great option for dinner parties and holds up really well for potlucks. 

Chickpeas, Carrots, Edamame & Cranberries


One red pepper, diced


All salad ingredients into one bowl.


Trying to get "the shot"


Chickpea & Edamame Salad


Chickpea and Edamame Salad


Adpated from Mother Thyme
Serves 10-12 as a side

Ingredients


Salad
3 15.5oz cans chickpeas (garbanzo beans) rinsed and drained
2 1/2 cups shelled edamame (soy beans)
1 red pepper, diced
3/4 cup carrots, diced
1/2 cup dried cranberries

Dressing
4 tablespoons canola oil
4 tablespoons olive oil
4 tablespoons white balsamic vinegar
1 tablespoon sugar
1/2 teaspoon dried oregano
1/2 teaspoon dried basil
Kosher Salt (about 1 1/2 teaspoons)
Freshly Ground Pepper (about 15 turns of the grinder)

Directions

1. In a large bowl combine chickpeas, edamame, red pepper, carrots and dried cranberries. Set aside.
2. In a small bowl combine dressing ingredients. Add kosher salt and pepper to taste (I've indicated what works well for us).
3. Add dressing to salad and toss to combine. Taste and adjust seasoning, if needed.
4. Serve at room temperature or chilled. 
5. Will keep in an air tight container in the refrigerator for up to 4 days.

Eat, Drink & Be Yummy!

Top Food Blogs-->